Introduction
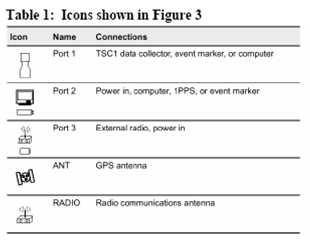
Figures 1 – 4 depict the features, ports, etc., of the Trimble 5700. As you can see, there are only two buttons (Data and Power), 5 LED indicators, 3 serial ports, and one antenna port (GPS). In fact, our receiver does not have a Radio antenna port because it serves as a RTK base station by connecting to an external antenna.

Receiver configuration
1. Straight Session
1. Connect serial cable to PC and receiver.
2. Power receiver up (Do not be connected to the antenna at this point)
3. Open GPS configurator
4. Select Trimble 5700 and then connect.
5. Under Config Tab
1.Remove power_up.cfg if one exist.
6.Under General Tab
1. Reset Receiver
2. Reconnect to receiver when prompted.
3. Format card (if only doing 1 observation session)
4. Staying under the general tab, set Elevation mask to 10, motion = static, everything else default and then apply.
7. Under Antenna Tab
1. Select Zephyer Geodetic
2. Select bottom of notch
3. Serial # optional at this stage
4. Height = 0.0 at this stage.
5. Apply
8. Under Log Data tab
1. Select “start data logging”
2. Set logging rate 1 sec.
3. Set position update rate (5min is OK, the faster the rate the bigger the file)
4. Set elevation mask same as in the General Tab (I don’t think this value is retained here in a power cycle, but better to be safe).
5. Select advanced
i. Ensure the primary has the same info as the first screen
ii. Select file interval = 24 hrs (This information is retained in the startup config file)
iii. Check start logging at power up (not sure this one is retained during a power cycle).
iv. OK
9. Under Config Tab (procedure for auto power_up.cfg for manual logging)
1. Select CURRENT.cfg
2. Select save as
3. Save as filename power_up.cfg somewhere on the PC hard drive
4. Browse for application file folder
5. Select power_up.cfg and then send
6. Select power_up.cfg on the receiver list of config files and click apply.
Note: This procedure will not log through UTC midnight. It stops and starts a new file at the day rollover. Is this bug????? In the firmware
2. Starting a scheduled session (ie logging through UTC midnight or multiple day ppk operations, or 24 hr BM occupations) This is referred to as time application file:
-
Select New
-
Select logging rate, position rate, elevation mask
-
Select start date
-
Select start time (local)
-
Select the duration
-
Select repeat interval to 24hrs for multiple day operations
-
Select sleep at survey end, receiver will power back on just before the session is due to begin.
-
Click OK to close the GPS configurator software
-
Power down receiver and disconnect from PC
-
Once setup over point, power up and hit the logging button for manual logging once enough sats are being tracked.
-
Stop logging using the logging button on the receiver when your session is over.
-
Multiple sessions can be recorded using the same settings without having to reconfigure, just start at step 12, provided we don't go through UTC midnight.
-
For timed application files just power up the receiver and the logging will auto start and stop based on the settings you configured.
Antenna setup
1. Set the tripod over the mark and level it
2. Make sure the tripod is secured (sandbags)
3. Carefully unroll the antenna cable.
4. Connect the antenna cable to the threaded connection on the antenna housing. Be careful not to cross-thread the connection.
5. Connect the antenna cable to the antenna port on the receiver.
6. Secure the dangling antenna cable to the tripod so that it will not blow in the wind.
7. Recheck
the level and centering of the antenna.
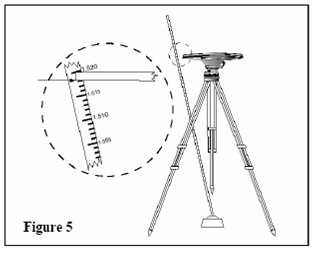
8. Measure slope distance from point on ground to bottom of notch on the antenna.
a. Using Pythagorean Theorem, calculate the missing side of the triangle using 0.16981m as the short side (radius of antenna).
b. Take this result and subtract 0.04435m which will accurately make the offset referenced to the bottom of antenna mount.
Important: Measuring to the bottom of the notch is the best way to achieve an accurate HI measurement simply because the other areas are not easily measured.
Power the receiver
The receiver can use power either from the battery or when available with the power cord as shown in figure 6.
Backup Batteries: These internal batteries should be inserted into the bottom panel of the Trimble 5700 (see Figure 4). The batteries recharge within the Trimble 5700, so they will probably already be inside. However, this should be verified before each survey to avoid any nasty surprises.
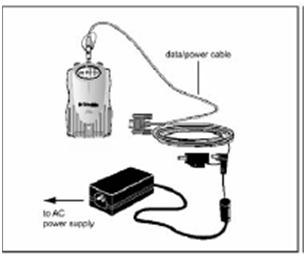
Figure 6
Receiver Setup and Operation
-
Connect the power system as described above.
-
Connect the antenna as described above.
-
Power on the receiver by pressing the Power button (see Figure 7).
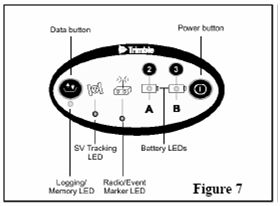
4. Check status with the indicator lights on the receiver. Make sure it is tracking satellites and logging. The indicator lights on the top panel (Figure 7) will show the following:
*Logging/Memory LED is on with no flash or slow flash, only.
*SV Tracking LED flashes slowly (fast flash means 3 or fewer SVs; no light means no SVs).
*Battery A is green with no flash (flashing indicates low or no power).
*Battery B is orange with no flash.
5. If the receiver does not automatically begin logging, then press the Data button (see Figure 7).
To end a survey, press the Data button for two seconds (no more, no less). This will stop data logging. Then, press the power button for two seconds (no more, no less) to turn the receiver off.
Note: Holding the Power button for 15 seconds clears the configuration, and holding the Power button for 30 seconds erases and reformats the memory card. Do not do this!
Data Download
GPS data are stored on removable Compact Flash memory cards
Data files have the an 8 character name with a 3 character extension: e.g., 12345678.t00
The first 4 numbers (1234) are the serial number of the receiver. The next three numbers (567) report the Julian Date. The final number (8) is the session number. The extension, *.t00, is a Trimble compressed file format. Hence, the Trimble software is required to convert this into a *.dat file. These filenames are automatically labeled by the receiver. Hence, the field operators must make careful notes so the station and date can be correlated with the filename after download.
-
On a computer with Trimble Data Transfer installed, create the local directory for downloading data.
-
Remove the memory card from the receiver.
-
Connect the memory card to the computer using either:
(a) A Compact Flash card reader
(b) A Compact Flash – PCMCIA adapter
The Compact Flash card will appear as an external disk in Microsoft Windows (e.g., using Windows Explorer).
-
Copy the *.t00 files to the local directory (e.g., click-and-drag in Windows or Windows Explorer).
3. Convert the *.t00 files to *.dat files in the local directory. To do this, in Windows, right-click the mouse button on the *.t00 file. In the menu, select “Convert to DAT format” (once again, this option only appears if Trimble Data Transfer has been installed). The *.dat file is now created.
Control points in New Brunswick
- Go to www.snb.ca
- Click on 'Control Survey Network' in the Geographic Services and Maps section.
- Click on the search link on product #1 (NB Survey Control Database)
- Accept the first terms and conditions link
- Click on 'NB High Precision Network'
- Choose a point that works for you.